


In this article, Part 4 of our series on validation with K2 SmartForms, we will be looking at server side validation. There are a few options available and the method below is by no means the only way to achieve server side validation, but it should suffice for the most common server side validation requirements.
Let first recall our sample application and just revisit what we are trying to accomplish. The client side interface of our demo application looks as follows:
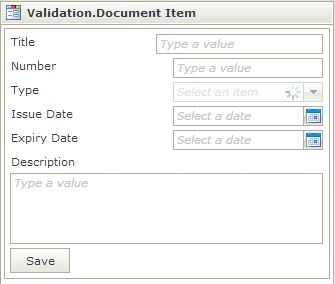
1 K2 SmartForms Server Validation – SmartForm
K2 Automated Testing Software
BenchQA allows full test automation of K2, including fully automated K2 SmartForms and K2 Workflow testing. It promotes test driven development for K2 and ensures continued quality assurance for K2 solutions. Easily apply changes to test cases to accommodate changes to K2 apps and ensure all apps are regression tested to avoid defects and assure continuous quality.

It is a basic document capturing system, which have a few validation requirements. One of these validation requirements, and the one which we will address in this article, is that the Number field must be unique. In other words when the user enters a document number we need to go look in the back-end database whether this number already exists, and if it does display an appropriate notification to the user. Let’s see how we can accomplish this.
Our first step is to implement the required back-end logic. In this simple example we are using a simple K2 SQL Service Object as our service layer, and therefore we will implement this logic as a SQL server stored procedure. The following stored procedure will suffice for demo purposes:

2 K2 SmartForms Server Validation – SQL Stored Procedure
Now that we have created the required logic in our service layer we need to refresh the appropriate K2 instance and verify that the method exists. We do that as usually in our SmartObjects – Services – Testing Tool. After right-clicking on the service and clicking refresh we can inspect our new service which looks as follows:

3 K2 SmartForms Server Validation – K2 SmartObject Tester
Great, now that we know that our back-end service is in place we can proceed to our designer and implement the rest of the required logic there. The first required step is to create a K2 SmartObject which we will use to communicate with this newly created service. We will be doing this using the default wizard to create SmartObjects. On the general step of the wizard we will simply name the SmartObject “ValidateDocumentNumber”, and select the “Advanced SmartObject” option.
On the “Define Properties & Methods” step of the wizard we will select the “Methods” tab and press “Add”. Now we will select the method we created above from the treeview, as indicated below

4 K2 SmartForms Server Validation – K2 Service Object Method Mapping
In the property mappings section we will press the “Create All” button. This will create a method parameter which we will use to map the document number to, and two properties which will be bound to our return values. These mappings are indicated below.
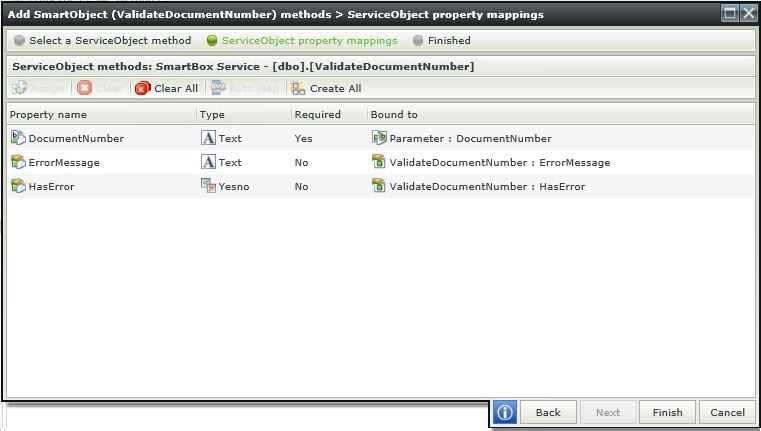
5 K2 SmartForms Server Validation – K2 Service Object Properties Mapping
Now we just press “Finish” to exit the mapping section and then press “Finish: once again to complete the creation of our SmartObject. Now that our SmartObject has been created and is ready for use we will proceed to our existing SmartForm View to implement the rest of the required functionality there.
The first step is to add two parameters which we will be using to store whether there was errors and what the errors was, if any. For this we proceed to the parameters section of the view and add the following parameters:
6 K2 SmartForms Server Validation – K2 Service Object Parameter
Now that our parameters are in place we will proceed to the “Rules” section and add the appropriate rules required to implement the validation. The first rule we will add is a rule which will call the SmartObject we will created and map the results to the parameters we created above. The rule itself looks as follows:
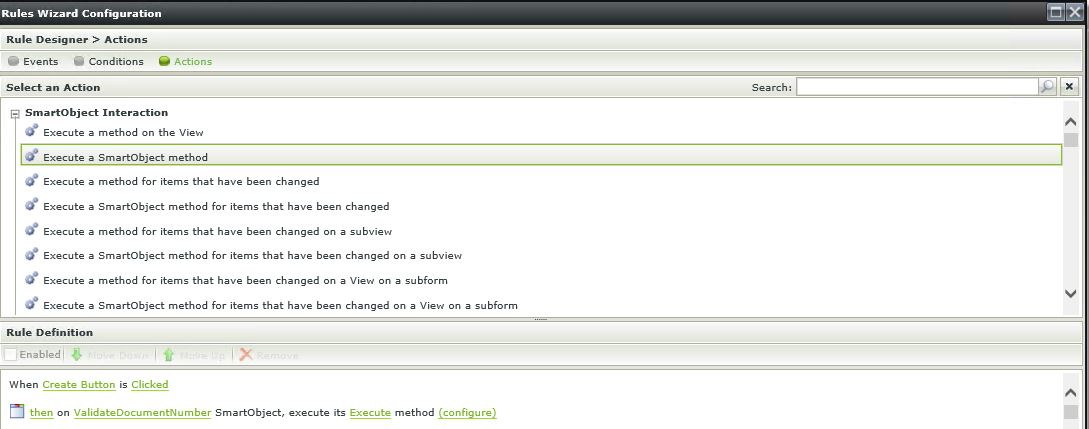
7 K2 SmartForms Server Validation – K2 SmartForm Rules Configuration
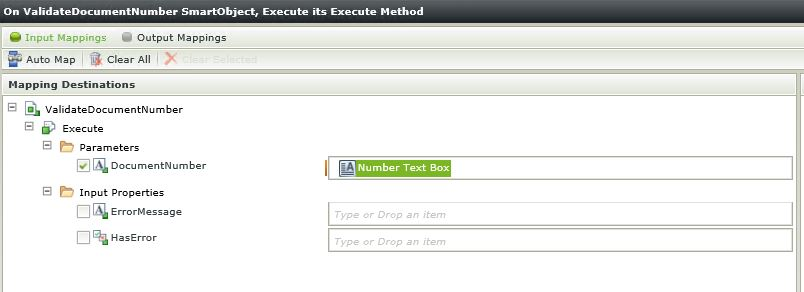
The next step is to click on the configuration object and configure the input and output mappings to the SmartObject call we will be making. The input is simply mapped to the appropriate textbox which we are using on the view for the Document Number, as indicated below.
8 K2 SmartForms Server Validation – K2 SmartObject Input
And as previously mentioned the output is mapped to the two parameters we created above, as indicated below:

9 K2 SmartForms Server Validation – K2 SmartObject Output
This completes the first rule, which we needed to communicate with the back-end. After this rule has been executed we have the required results at our fingertips, and all that remains to be done is display a message to the user if appropriate, i.e. if an error occurred. For this we need to create another rule, as indicated below:
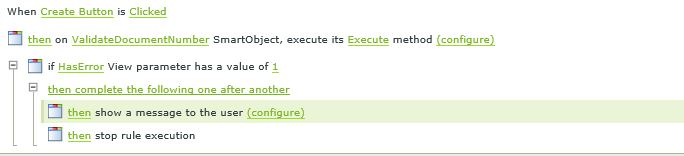
10 K2 SmartForms Server Validation – K2 Validation Output
We configure the message to the user by making use of the ErrorMessage parameter we mapped to our SmartObject earlier, as follows:
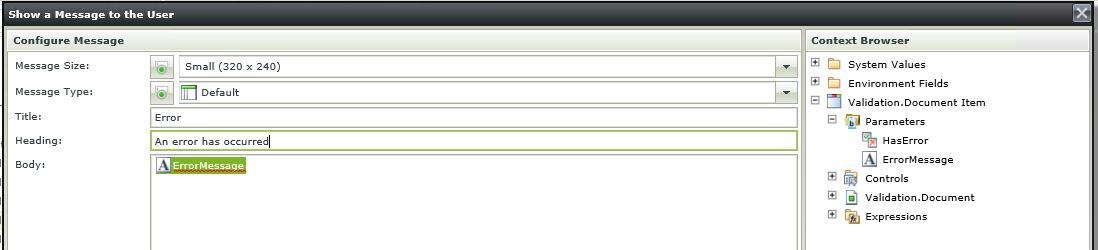
11 K2 SmartForms Server Validation – K2 Validation Messagebox
And that is it! Now if we click on the ‘Save’ button when we have entered a document number which already exists we will be presented with the following error message:
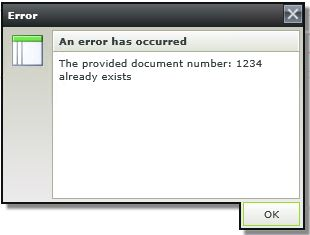
12 K2 SmartForms Server Validation – K2 Validation Error
Thank you for joining us for Part 4 of our series on validation with K2 SmartForms. The next article, ‘Part 5’ of the series, will be on immediate field level validation, which is a continuation on Part 2 of the series.
About K2 SmartForm Solutions and Velocity IT
K2 SmartForms revolutionises the rapid design and delivery of online forms that are workflow enabled and connected to line of business applications. Velocity IT is a K2 partner with K2 master status that are backed by over 15 years’ experience with K2. In fact, we are the most experienced K2 partner in Europe. We know the shortest path to a successful K2 solution and are trusted by K2 for some of their major customers. For more information on our services and solutions, or to become a successful K2 workflow customer of Velocity IT, contact us today.