


This is the 3rd part of a short series of articles on validation with K2 SmartForms. In the previous article, Part 2, we looked at simple client side validation using the built in validation functionality provided by K2 SmartForms. This article will build on the base we established there and take it a little further to address more complex requirements. To recap, lets have a quick look at our example form again.
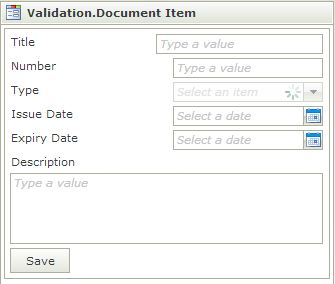
Image 1 – Complex Client Side Validation – Example form
K2 Automated Testing Software
BenchQA allows full test automation of K2, including fully automated K2 SmartForms and K2 Workflow testing. It promotes test driven development for K2 and ensures continued quality assurance for K2 solutions. Easily apply changes to test cases to accommodate changes to K2 apps and ensure all apps are regression tested to avoid defects and assure continuous quality.

We will specifically look at the following requirements:
1. The Expiry Date needs to be in the future.
2. The Expiry Date needs to be after the Issue Date.
3. The Description is required only if the document type is ‘Official’.
Example one and two are representative of situations where we will need to implement validation based on more than one field. Example three is representative of a situation where the value of one field determines whether another field is required or not. Both these scenarios are cases where the default validation mechanism provided by K2 falls a little short, but fortunately we can dig into our bag of tricks to make it work.
The Expiry Date needs to be in the future.
In example one it seems as if only one field is involved in the validation, but because we need today’s date there is actually two fields involved. Lets start by addding a calender control containing today’s date to the form. We do this by dragging a calender control onto the form and then set the default value in the properties panel to ‘Today (Current Date)’.

Image 2 – Complex Client Side Validation – A calender control containing today’s date
We do not want the user to see this date, so we will hide the control by setting its visibility to false.
Image 3 – Complex Client Side Validation – Setting the visibility to false
The next step is to insert a dummy textbox control which we will be using to validate against. The naming of this control is extremely important, as we will be using it to inform the user of the requirement. We will name the control ‘Expiry Date needs to be in the Future’. Additionally we will also set the visibility of this control to false, because we do not want the user to see it as it is only for validation purposes.
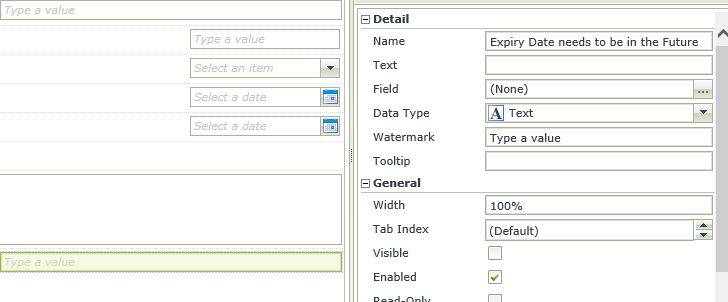
Image 4 – Complex Client Side Validation – Hidden text box used for validation
Next we will bind this dummy control to an expression, which we will use to trigger the validation. What we will be doing in the expression is to assign an empty string when the expiry date is in the past, and any dummy value when the date is in the future and valid.
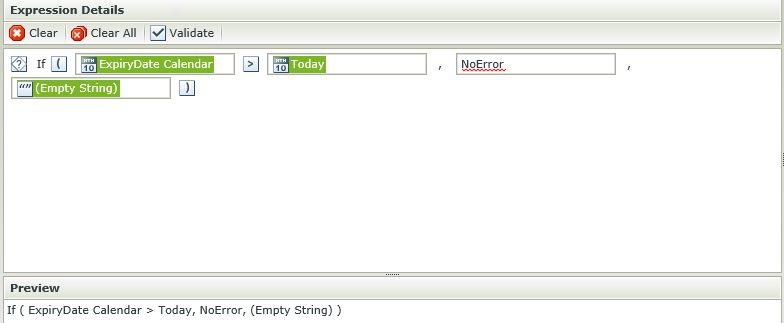
Image 5 – Complex Client Side Validation – Expression used to force a validation error
The next step is to add a validation rule like we did previously. We add the rule when the create button is clicked.
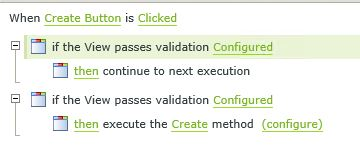
Image 6 – Complex Client Side Validation – Adding a validation rule
Next we need to configure our validation rule. We will mark our dummy expression text box as required, and then uncheck the ‘Do not validate hidden controls’ checkbox to indicate that hidden controls should also be validated. Additionally we will check the box to show validation messages in a popup.
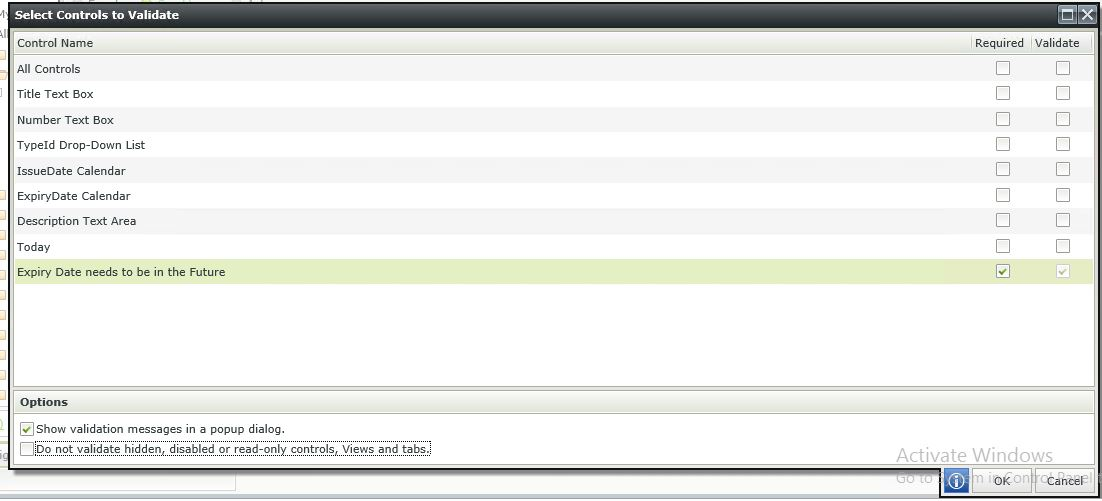
Image 7 – Complex Client Side Validation – Configuring the validation rule
Well, lets see what happens when we select a past date and try to save. We get a warning popup saying ‘Expiry Date needs to be in the Future a value is required’.
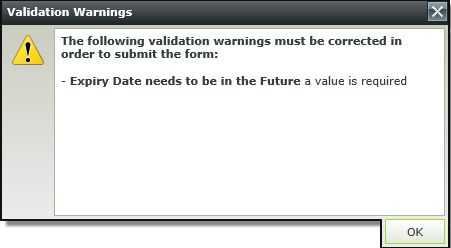
Image 8 – Complex Client Side Validation – Error being displayed
One of the things that this solution lacks is a visual indicator on the screen, like a red border around the expiry date, to indicate when it is in error. We can optionally solve that by inserting some jquery into the page, but for now this will do. The ‘Expiry Date needs to be in the Future: a value is required’. text is also not ideal, and we will see how to change that in the next section.
The Expiry Date needs to be after the Issue Date.
For this requirement we will take it one step further and include a control validated based on a regular expression to improve the validation message. First lets add a dummy textbox, hide it, and name it ‘Expiry Date’. Now bind the textbox to an expression which will contain the value 1 for true if our expiry date is in fact in the future, and 0 for false if our expiry date is in the past.
Image 9 – Complex Client Side Validation – Configuring the expression
Next we will setup regular expression based validation on the textbox. Go to the validation section in the properties window, select Regular Expression and add a new expresion containing the following: ^[1]{1}$. This basically says that the textbox needs to contain a 1. For the message enter the following: ‘needs to be after the Issue Date’.

Image 10 – Complex Client Side Validation – Adding the regular expression
And lastly we need to edit our validation rule added previously to also validate this new textbox. Great, and now when we press save with an issue date after an expiry date we get prompted with the following message: ‘Expiry Date needs to be after the Issue Date’

Image 11 – Complex Client Side Validation – The error being generated
The Description is required if the document type is ‘Official’.
For this requirement we will once again make use of a hidden textbox control, but the process is a little simpler than the previous two examples. First add the hidden textbox, and name it Description. Now bind this textbox to an expression, which will insert an empty string into the textbox when the document type is ‘Official’ and any dummy string of non-zero length when the document type has not been selected as ‘Official’.

Image 12 – Complex Client Side Validation – Configuring the expression
Finally go to the validaiton rule we have previously set up and mark this textbox to be validated as well. So what now happens is that if ‘Official’ is selected as the document type the dummy textbox contains an Empty String, and when we save the following validation message is displayed: ‘Description: a value is required’.

Image 13 – Complex Client Side Validation – The error being generated
Well, that is it for Part 3 of the series on validation. Hope to see you next time for Part 4 where we will be looking at how we can add some server side validation to our application.