


This is the second part of a short series of articles on K2 SmartForms validation in which we will be looking at how to solve simple client side validation requirements using the out of the box functionality provided by K2 blackpearl Smartforms. The following scenarios will be addressed at the hand of the example discussed in the previous article.
K2 Automated Testing Software
BenchQA allows full test automation of K2, including fully automated K2 SmartForms and K2 Workflow testing. It promotes test driven development for K2 and ensures continued quality assurance for K2 solutions. Easily apply changes to test cases to accommodate changes to K2 apps and ensure all apps are regression tested to avoid defects and assure continuous quality.

1. Required fields – For the Title, Document Number, Type, Issue Date, Expiry Date.
2. Maximum length requirements – for the Title and the Description.
3. Regex validation – for the format of the Document Number.
Data Layer
When the requirements for this example project was established by our imaginary business analyst, she specified that certain fields are required to insure that the data we collect is valid. As usually the logical starting point for this is to mark the relevant columns in the database as not null. So let’s first head off to SQL Server and sort that out…
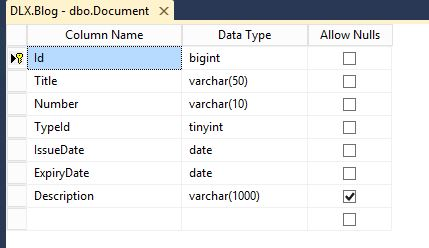
K2 SmartForm Client Validation – Image 1 SQL table to not allow NULL values.
K2 Service Layer
Great, now let’s see what happens as we head up the stack from the server side to the client. After the database our next layer is the service objects, so lets investigate using the K2 SmartObject Tester.
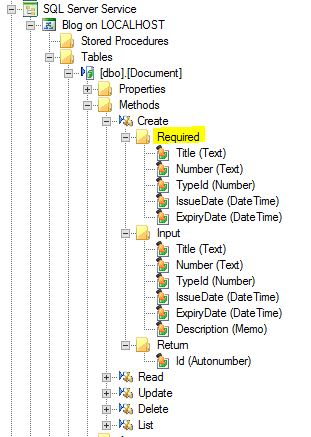
K2 SmartForm Client Validation – Image 2 SQL Server Service
The K2 blackpearl service object was clever enough to now recognize that that these fields are required to create an entry in SQL for this document. No further work to be done on the service layer, but it was good to note.
K2 SmartObject Layer
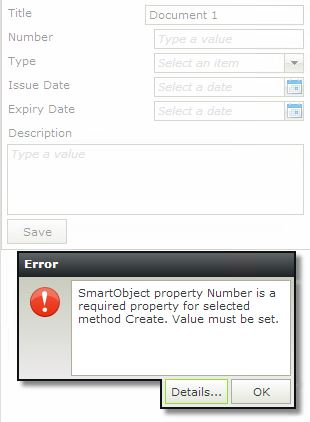
The K2 SmartObject layer sits one more step closer to where we will actually be servicing the user experience aspect of this requirement. When we investigate using the K2 SmartObject Services Tester, we note that these fields have now also been marked as required in the object explorer, and when we actually try to execute the create method without supplying these values we get the following result.

K2 SmartForm Client Validation – Image 3 K2 SmartObject Tester
K2 blackpearl has done most of the work for us on this level too, and is making sure that we don’t violate any data requirements. Next lets take a look at the client to see what is happening there.
K2 SmartForms Layer
The first thing to notice here is that visually, i.e. from a user’s perspective, absolutely nothing has changed. It is still just a form with 6 fields which might or might not be required, who knows. Let’s have a look at what happens when we just fill in a title for the document, thinking that we will complete the rest later, and then press Save.
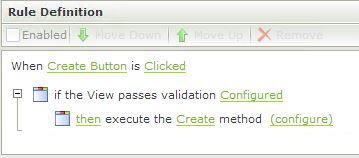
K2 SmartForm Client Validation – Image 4 Unfriendly error message on save
We are greeted with a very unfriendly message. As a developer this message makes complete sense, but for a regular system user this might as well be a foreign language. It seems like our application has broken, in a similar fashion to when an exception occurs. Even worse, the system only shows me an error for the number field, although we actually know that both the number, type and dates are also required. So how do we improve this?
Back to the K2 SmartObject
The SmartObject consists of both properties and methods, and this is the error being generated when calling the method with invalid data in the properties being mapped to the required method parameters. We can get one step closer to a usable solution by marking the properties on the smart object as required as well, lets do that first.

K2 SmartForm Client Validation – Image 5 Marking required SmartObject properties.
Now if we try to save again we receive a much better error message. The system at least notifies us of all the required properties that have not been completed in one error message. It is however still an error message which has been generated when mapping to the smart object, and not a user friendly client side notification.

K2 SmartForm Client Validation – Image 6 Error when mapping to the SmartObject
Generating user friendly client side K2 SmartForm validation messages
To generate a user friendly client side notification we need to go and add a K2 SmartForm validation rule before we call the Create method of the SmartForm.
K2 SmartForm Client Validation – Image 7 Creating a K2 SmartForm validation rule
And then configure the K2 SmartForm rule according to our requirements.
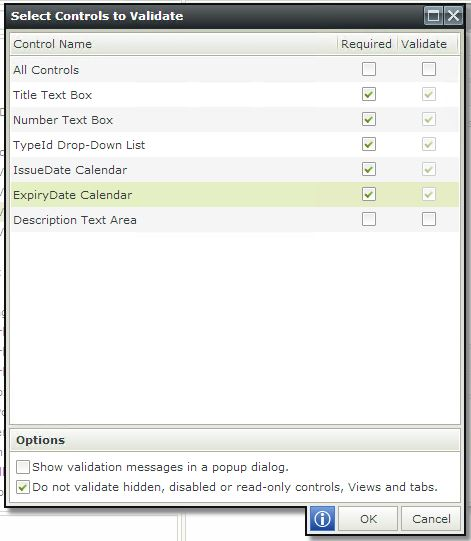
K2 SmartForm Client Validation – Image 8 Configuring K2 SmartForm validation
If we now return to the screen we have a much improved user experience, as indicated below.
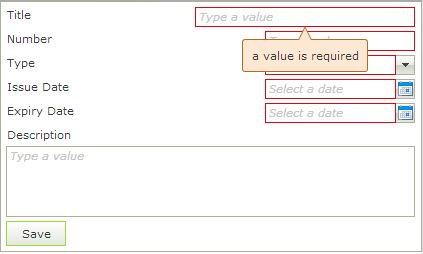
K2 SmartForm Client Validation – Image 9 A user friendly K2 SmartForm validation message
This experience can still be visually improved, for example by indicating which fields are required before the user press the save button, displaying a K2 SmartForm validation message on the screen without the user needing to mouse over the field and showing a validation summary. These techniques will be discussed in Part 6 of this series.
Max Length and K2 SmartForm regular expression validation
To satisfy the second and third validation requirements specified at the start of this article we need to shift our focus to the validation section of the K2 Designer properties panel.

K2 SmartForm Client Validation – Image 10 Max length and validation using a regular expression pattern
To validate the maximum length we quite simply add the maximum length requirement into the Max Length field and enter an appropriate message to display to the user in the Message field. To validate the regular expression requirement we need to open the Patterns section in the K2 SmartForm, add our required format for the regular expression and viola. For the document numbers the following format was specified: 2 capital alphabetic characters followed by a dash followed by 6 numeric characters. The regular expression for this format is ^[A-Z]{2}-[0-9]{6}$. To add it we simply click on the ellipses following the pattern field and then add.
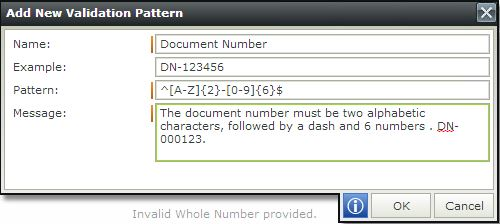
K2 SmartForm Client Validation – Image 11 Adding a pattern to match a document number
The following K2 SmartForms regular expression validation patterns are included amongst the patterns by default:
• Alphanumeric
• Characters Only
• Email Address
• Phone Number
• Social Security Number
• URL
• Whole Numbers Only
• Zip Code
In Part 3 of this K2 blackpearl SmartForms validation series we will be looking at more advanced client side validation techniques. For instance how do we validate one field when it is required dependent on the value of another field, or how do we use a simple expression to validate correct input.
About K2 SmartForms
K2 SmartForms is rapidly establishing itself as the go-to enterprise technology for no-code business application form development and configuration. The product is browser-based and can be used by a variety of users in the business and IT ecosystem.
K2 SmartForms integrates seamlessly with K2 blackpearl Workflows using K2 SmartObjects. In fact, K2 SmartForms can be integrated with any data source like SAP, SalesForce.com, Microsoft SharePoint, IBM FileNet, REST and any web services using K2 SmartObjects and K2 Service Brokers.
About Velocity IT
Velocity IT is a UK based IT company that are business process architects and K2 masters. With over 15 years’ K2 design and development experience, we are the forefront of K2 solution design and implementation. Our K2 solutions have a user base of over 300,000+ users worldwide. Please visit velocity-it.com for more help and information.