


This is part one of a six part series on data validation while developing applications using K2 SmartForms.
The series consists of the following articles:
Part 1 – Introduction
Part 2 – Simple (Out of the Box) Client Side Validation
Part 3 – Complex Client Side Validation
Part 4 – Server Side Validation
Part 5 – Immediate Field Level Validation
Part 6 – Visual Validation Indicators Validate input with K2 SmartForms – Part 1 : Introduction
K2 Automated Testing Software
BenchQA allows full test automation of K2, including fully automated K2 SmartForms and K2 Workflow testing. It promotes test driven development for K2 and ensures continued quality assurance for K2 solutions. Easily apply changes to test cases to accommodate changes to K2 apps and ensure all apps are regression tested to avoid defects and assure continuous quality.

Introduction
In this series validation will be discussed at the hand off a simple input form used to enter data into a K2 SmartForms based document control system. Entries into the system will consist of ‘Documents’ that is issued on a certain date and expires on a certain date. A document data entry consists of the following fields:
• Title : A free text field allowing all characters. This field is required and have a max length of 50 characters.
• Document Number : A text field that needs to be in a specific format. Two alphabetic uppercase letters, followed by a dash, and then followed by 6 numeric characters. For example: ‘FP-000001’ or ‘AB-749317’. The document number needs to be unique. This field is required.
• Document Type : A drop down with two options: Official/Unofficial. This field is required.
• Issue Date : A date field allowing any date. This field is required.
• Expiry Date : A date field allowing only future dates. Additionally the expiry date also needs to be after the issue date. This field is required.
• Description : A free text field allowing all characters.
This field has a max length of 1000 characters. If the document type is official this field is required, otherwise not.
The basic K2 SmartForm form layout is depicted below.
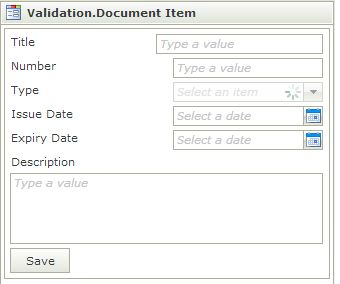
K2 SmartForms Valition Scenario Summary
The document entries will be stored in a MSSQL database which is depicted below.

K2 SmartForms Valition Scenario Database Design
K2 SmartForm Validation requirements
To summarize, the following are the requirements we need to implement from a validation perspective:
1. Required K2 SmartForm fields : Title, Document Number, Type, Issue Date, Expiry Date.
2. Max length of the Title and the Description K2 SmartForm fields.
3. Format of the Document Number.
4. The Expiry Date needs to be after the Issue Date.
5. The Expiry Date needs to be in the future.
6. The Description is required only if the document type is ‘Official’.
7. The Document Number needs to be unique.
Suggested K2 SmartForms solution
Requirements 1 to 6 will all be validated on the client side. This will prevent an unnecessary round trip of data to the K2 blackpearl server and provide instant feedback to the user.
Requirements 1 to 3 is quite simple and can be performed using the default tools provided by K2 SmartForms, no tricks needed here. These ‘Out of the ‘Box’ K2 validation methods will be discussed in Part 2 of this series.
Requirements 4 to 6 are more complicated, but fortunately we have a few tricks up our sleeve to make this work. These complex client side validation techniques will be discussed in Part 3 of this series.
Requirement 7 requires the K2 tool to check all other entries, see whether another document with the same number has been entered already, and react accordingly. This can not be done on the client side only, as we need to communicate with the K2 SmartForms server to check the other entries. Server Side Validation will be discussed in Part 4 of this series.
We also have a few options regarding when exactly we want to validate the K2 data. We can make use of field level K2 validation to validate each field on its own and provide the user with immediate feedback when he/she moves to the next field or tabs out of the control. Alternatively we can make use of K2 SmartForms form level validation and validate all six requirements at once when the ‘Submit’ button is pressed.
The first option is slightly more complex and requires more work, it will be discussed in Part 5 of this K2 blog series. The second option is more straight forward and parts 2 and 3 of this series will be validated according to this method.
Finally we also have a bunch of different options when it comes to displaying the actual K2 SmartForm validation requirements and errors to the user. Should we use red borders or bold labels to display required fields? Do we indicate errors with a red asterisk, display an in-line message or make use of a pop-up? These and other various techniques will be discussed in Part 6 of this series.