In this blog, I will use multi-user impersonation in a BenchQA test case to test multi-user interaction with a K2 SmartForms application. We will start by submitting a new leave request process using one user, and automatically login as another user to approve the leave request.
K2 Automated Testing Software
rnBenchQA allows full test automation of K2, including fully automated K2 SmartForms and K2 Workflow testing. It promotes test driven development for K2 and ensures continued quality assurance for K2 solutions. Easily apply changes to test cases to accommodate changes to K2 apps and ensure all apps are regression tested to avoid defects and assure continuous quality.
Before we start, you need to have the Leave Request K2 SmartStarter Application installed on the K2 environment to run the BenchQA test. You can find the Leave Request Application at the following location:
https://www.k2.com/products/marketplace/smartstarters
STEP 1 – Install BenchQA and the K2 Leave Request SmartStarter Application
From the K2 SmartStarter website, navigate to the “Leave Request” project and download the zip file that applies to your version of K2. Install it on your K2 server.
If you have BenchQA installed, we can start by creating the new test cases to demonstrate multi-user impersonation. If you don’t have BenchQA installed, please download a free trial from the Velocity IT website and request a trial licence.
Also, please review the help documentation included in BenchQA, as it will assist you in creating the automated K2 test cases.
STEP 2 – Create a simple BenchQA K2 Test Case
Open BenchQA, create a new project and a new test case.
Open the test case and drag the “Navigate to URL” from the toolbox onto the test case designer.
STEP 3 – Configure the first K2 user impersonation
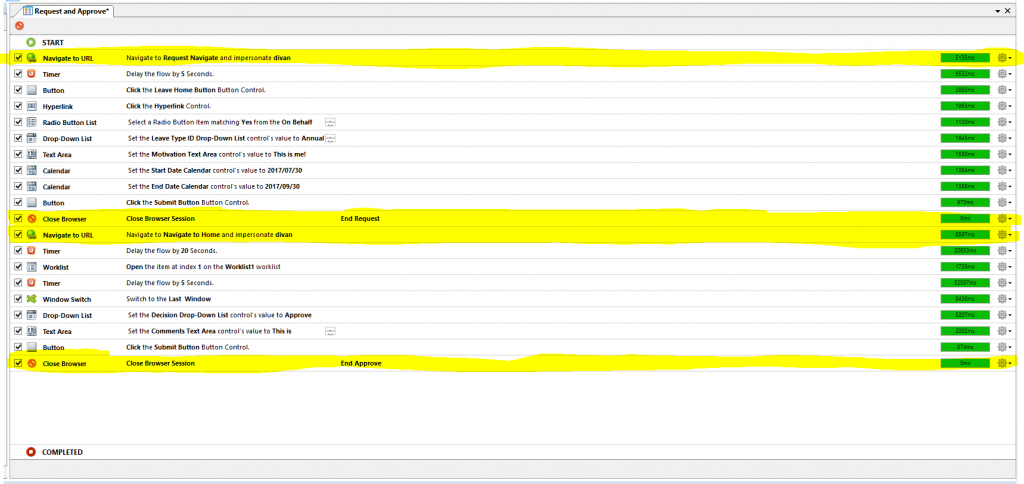
When configuring the “Navigate to URL”, there will be an option to select “Impersonate”. Check the Impersonate checkbox, then add the user you would like to impersonate. Remember, this will be the details of the user that submits the new leave request.
After we’ve selected the person to be impersonated and the URL where we want the application to navigate to after impersonation, we then add the remaining test case steps (using the toolbox items) in order to submit the new leave request successfully. This is done in Step 4 below.
Please note: after each impersonation, we need to add a “close browser” tool item to close the browser and then reopen a new URL with a different user to impersonate. This is important to switch between the two user’s logins in this example.
STEP 4 – Add the remaining K2 Test Case Steps
Add “Navigate to URL”, then the remaining test case steps, and finally “Close Browser” step.
STEP 5 – Configure the second K2 user impersonation
This will be the person that actions the submitted leave request.
After we’ve added or selected the person to be impersonated and the URL where we want the application to navigate to, we then add the remaining test case steps (using the toolbox items) in order to approve the new leave request.
STEP 6 – Optional: Configure impersonation in a new browser window
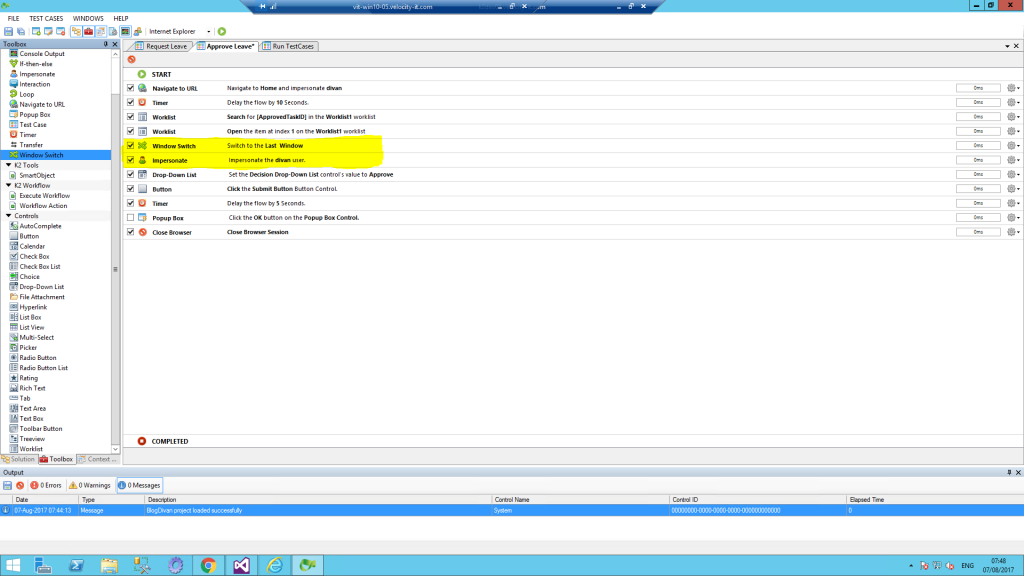
Please note: BenchQA also has an Impersonate toolbox item where you can impersonate in a second browser window if you need to.
When you use a Window Switch toolbox item, you can add an Impersonate toolbox item just after the Window Switch and this will handle the credentials dialog on any browser.
You can configure the Impersonation tool item the same way as the Navigate tool item.
CONCLUSION
The multi-user impersonation feature in BenchQA is a powerful tool to create multi-user test scenarios when automating K2 testing.
We can simulate different users to perform tasks easily within a workflow, as demonstrated in the above example, thus making the process of automating your test cases quick, easy and effective.


