


K2 SmartForms is a quick and easy way to create powerful interfaces that can provide great functionality to users in a short amount of time. However, even with the rules and expressions built directly into the K2 SmartForms, they are considered fairly static. It is through the use of the K2 Workflow that introduce behaviour for these forms. Through the K2 Workflow we can define the flow of a system, create activities to be completed, and specify an organisational structure of events that influences and manages the order in which things happen throughout a system.
In this new series on the K2 Workflow, I will start off by simply showing you how to create a new K2 Workflow project in Visual Studio 2013 and take you through some of the basic UI elements.
K2 Automated Testing Software
BenchQA allows full test automation of K2, including fully automated K2 SmartForms and K2 Workflow testing. It promotes test driven development for K2 and ensures continued quality assurance for K2 solutions. Easily apply changes to test cases to accommodate changes to K2 apps and ensure all apps are regression tested to avoid defects and assure continuous quality.

We’ll start by creating the new project.
Once you have Visual Studio 2013 open, Click on File, New, Project

1 – K2 for Visual Studio New
In the “New Project” dialog box that has opened up, Select the “K2” category under the “Templates” box to the left.

2 – K2 for Visual Studio New K2 project
Visual Studio will now display all the K2 templates to the right, for this example we’ll choose the “K2 Workflow Project”

3 – K2 for Visual Studio New K2 project
Give your project a name, and ensure that you have placed it in an appropriate directory.
4 – K2 for Visual Studio New K2 project – Project name
Now click on the “OK” button, to allow Visual Studio to create the K2 Workflow project.
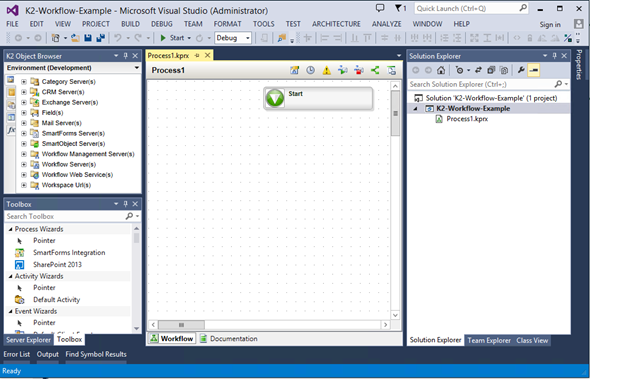
5 – K2 for Visual Studio – Design Canvas
When a new K2 Workflow project is created, K2 will automatically add a new “.kprx” file to the solution. Each kprx file will contain a single workflow, however K2 does provide the ability for a workflow to reference other work workflows stored in other kprx files. This way we can easily organize our workflows and sub-workflows by placing workflows in neatly organized and aptly named kprx files.
Additionally, K2 will automatically add the “Start” component to the default Process1.kprx file. Each workflow must contain a “Start” component. The “Start” component can be seen as the entry point of the respective workflow, regardless of what kicks off the workflow.
6 – K2 for Visual Studio – K2 process start
To the left of the Screen there are two menu’s available. The first is the K2 Object Browser.
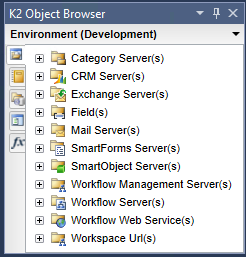
7 – K2 for Visual Studio – K2 object browser
The K2 Object Browser is used to browse the items related to the K2 Environment we are working in. Through this browser we can access Smart Objects, Expressions, Data fields and numerous other items.
Below the K2 Object Browser is our Toolbox.
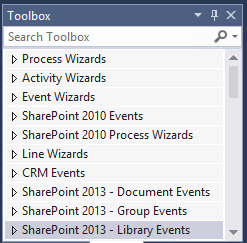
8 – K2 for Visual Studio – K2 Toolbox
The Toolbox contains all the components that we will use to build our K2 Workflow. From here we can simply drag-and-drop components from the Toolbox and onto our designer. The components are used to manage the data and flow of the K2 Workflow.
There is no need to “link” your K2 Workflow with any specific instance of K2. When a workflow is built and deployed it will automatically deploy to the appropriate K2 Environment, which can then be accessed from the K2 SmartForms side.
Now that you’ve had a good introduction to creating a new K2 Workflow project and the basic Visual Studio components involved, you can easily start building your workflow by using the components discussed. Next time we’ll take a deeper look and starting build such a workflow.
Velocity IT – The K2 blackpearl Masters
Velocity IT helps organisations to streamline their business processes through business process management (BPM), business process automation and business process improvement. Our business transformation services ensure businesses streamline their operations and increase their bottom line. We use K2 BPM tools; including K2 blackpearl, K2 smartforms and K2 Appit to deliver business process automation applications. We have over 15 year’s experience in this field, and we are also K2 masters and a K2 partner.
Please visit us at velocity-it.com to learn about our world-class K2 solutions and to become a customer.