In this blog we use a facial recognition Artificial Intelligence cognitive service for recognising a human face for the purpose of identity verification.
A typical scenario is an identity verification process when applying for credit. The person applying for credit uploads an image of their government issued passport or driving licence and also uploads a selfie using a mobile phone registered to them.
Using a facial recognition Artificial Intelligence API, a person’s identity can be verified by comparing a selfie taken with their mobile phone (using a mobile phone app) with a photo in the person’s identity document.
For our scenario, we will use the Microsoft Azure Face API and integrate it with UiPath RPA to automate the process using software robotics.
We will detect a face’s age and gender then edit the uploaded image using a crop feature.
The steps below show you how to leverage the Microsoft Azure Face API from UiPath.
Step 01
Obtain the Service URL and subscription key from the Microsoft Azure Portal. For more information, see the Microsoft Azure website for details. The service contains 4 methods –
1) Add a Face
2) Identify a Face
3) Verify a Face
4) Detect a Face
Step 02
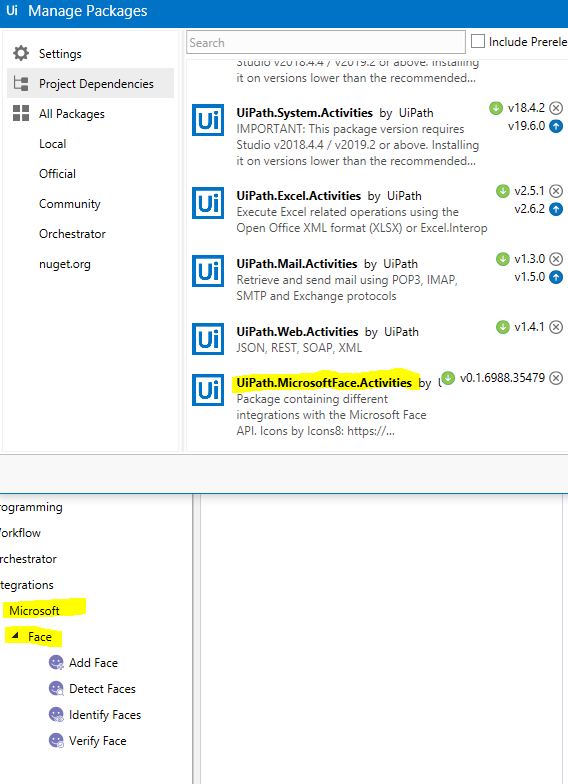
Add the UiPath.MicrosoftFace.Activities package to the UiPath Project Dependencies in the UiPath designer:
Notice the Face object is added and the methods that can be called by the UiPath Robot.
Step 03
Use the add the face and then detect face to detect the face’s properties – in this example, we detect the age and gender.
Add Face
Add the face image of a person into a collection for facial verification and identification. Below is the configuration in UiPath:
Detect Face
Next, detect the face. This is the core AI function that detects the human face in an image. Below is the configuration in UiPath:
Step 04
Let’s use the outputs of the face detection. To do this, simply declare a UiPath collection (or array) variable of type UiPath.MicrosoftFace.Face[]
This is shown below:
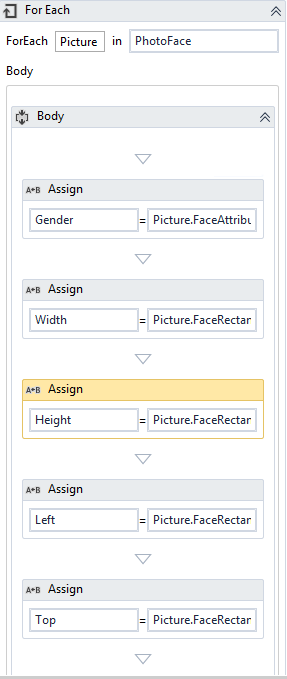
You can now easily loop through the array variable using a UiPath for each loop and reference the face attributes using the following syntax:-
- Picture.FaceAttributes.Gender
- Picture.FaceAttributes.Age
You can also crop facial images; Height, Width, Left and Right using the rectangle properties.
The screenshot below shows how to loop through a collection of detected face images in UiPath and assign properties (for example Gender) to a variable. This can be used by a RPA software robot to do additional RPA processing:
Conclusion
This example demonstrates a simple recognition automation, however, using UiPath’s extensive features, more advanced steps can be included to suit the requirement of the verification – checkout our recent blog on our award-winning automation and workflow solution, built in Uipath and K2.
Thanks for taking the time to read this blog, we hope you found it useful. If you need further technical advice or support on UiPath or other low-code development platforms, get in-touch with one of our experts today.


