


An alternative to the K2 worklist control is a web-based Calendar view to display a user’s tasks. This Outlook-style calendar allows users, at a glance, to view tasks that are upcoming, due and overdue. In this blog post you’ll learn how to implement a calendar-based worklist in K2.
K2 Automated Testing Software
rnBenchQA allows full test automation of K2, including fully automated K2 SmartForms and K2 Workflow testing. It promotes test driven development for K2 and ensures continued quality assurance for K2 solutions. Easily apply changes to test cases to accommodate changes to K2 apps and ensure all apps are regression tested to avoid defects and assure continuous quality.

The Calendar view is a custom K2 control that supports flexible display configurations like colour coding, task stacking and filtering. It also has an option to display a month, week or day view of tasks. This is similar to the capabilities Outlook provides and familiar to most users.
The control sources task data from K2 SmartObjects, making it flexible to support a variety of task data sources.
The original K2 Community control was modified to include enhancements and additional features.
Registration is required to view the full article. Click here to register FREE…
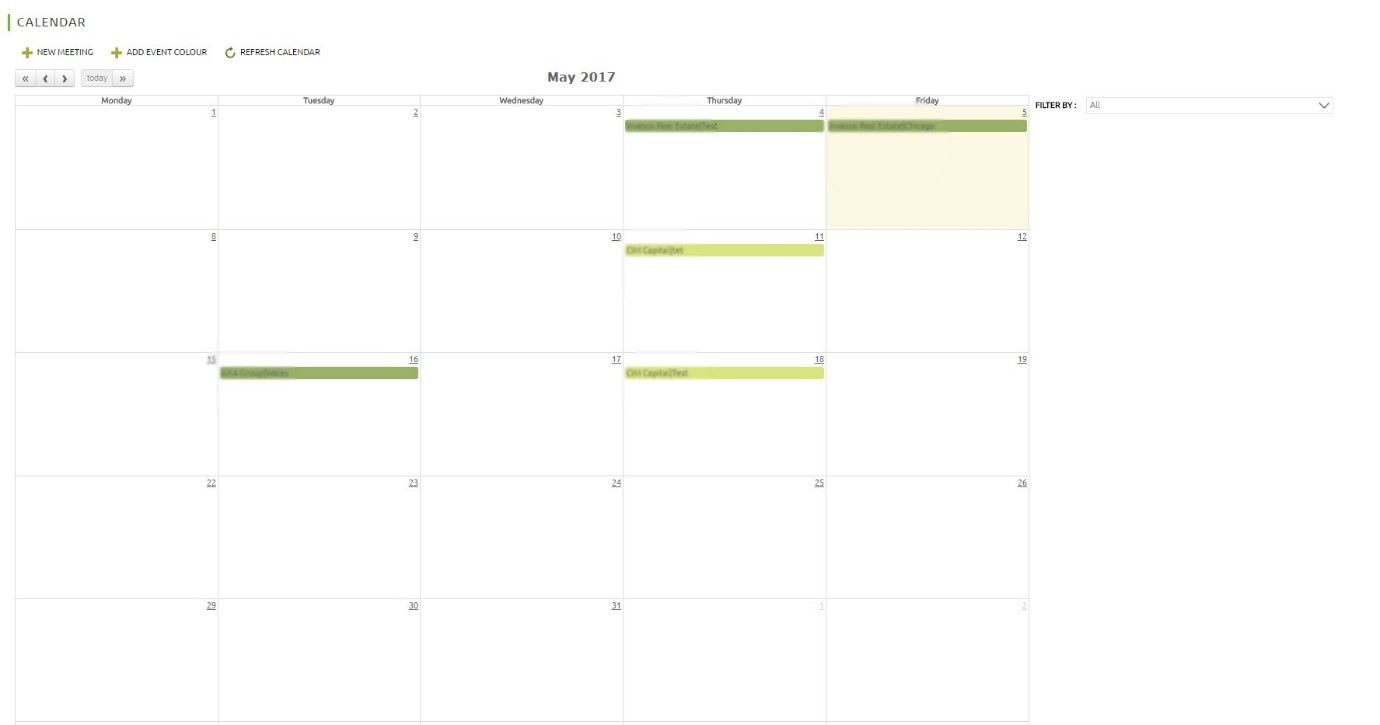
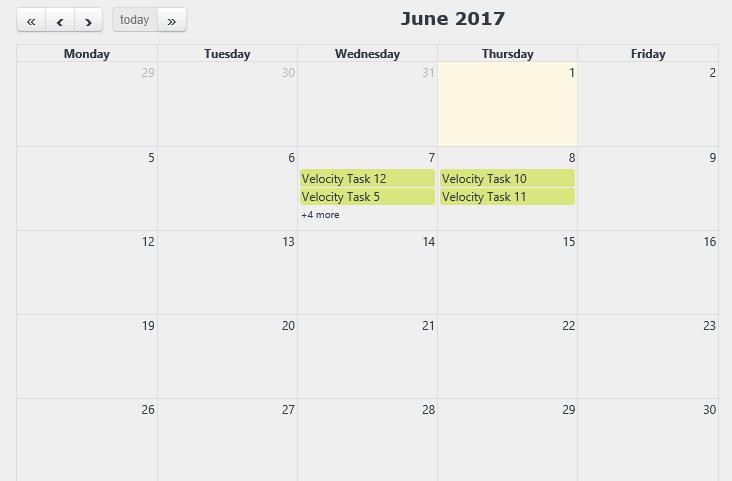
The screenshots below show various configurations of the Calendar:
- Meeting calendar with categorisation of meetings and the ability to add post-meeting notes
- Full task list showing overdue, due and planned tasks filtered by task types (right hand side dynamic checkbox lists). Calendar months can be scrolled forward and backwards

[ihc-hide-content ihc_mb_type=”show” ihc_mb_who=”1,2,3,5″ ihc_mb_template=”1″]
- Full task list showing task-stacking for devices with smaller screens
How to install the Calendar control?
Please follow the steps below.
- Deploy the Calendar control’s dll to the ‘C:Program Files (x86)K2 blackpearlK2 SmartForms Designerbin’ and ‘C:Program Files (x86)K2 blackpearlK2 SmartForms Runtimebin’ folders and register it. Remember to restart IIS.
- Once registered, you can find the control on the control’s list in K2 Designer called ‘K2ANZ Full Calendar’ under Custom Control.
![]()
If you have any queries, access the enhanced dll, need help from our team to apply the control, please email us at contact@velocity-it.com
How to configure the Calendar control?
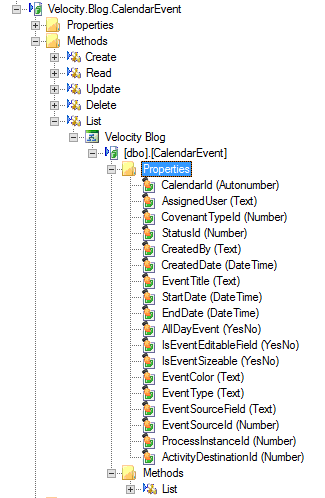
The SmartObject below is used as the data source for the Calendar in this example.
The screen below is used to configure the data source configuration for Calendar. Notice the flexible configuration that can be applied to control how the Calendar’s behaviour is changed.

Below is a description of each of the properties:
Value – Primary Key of Data source
Display Template – Display Text for Calendar events
Event Title Field
Start Date Field – Event Start Date
End Date Field – Event End Date
All-Day Event Field
Is Event Editable Field (Optional)
Is Event Sizeable (Optional)
Event Color Field (Optional) – Colour of event label on calendar – Hex code
Event Type Field (Optional)
Event Source Field (Only needed if you plan to allow editing multiple data sources)
Event Source ID Property Field (Only needed if you plan to allow editing multiple data sources)
Filter – This field can be used to filter the events based on the property values.
Filter Example – AssignedUser==’Denallix/Adam’ ,Status==’Active’
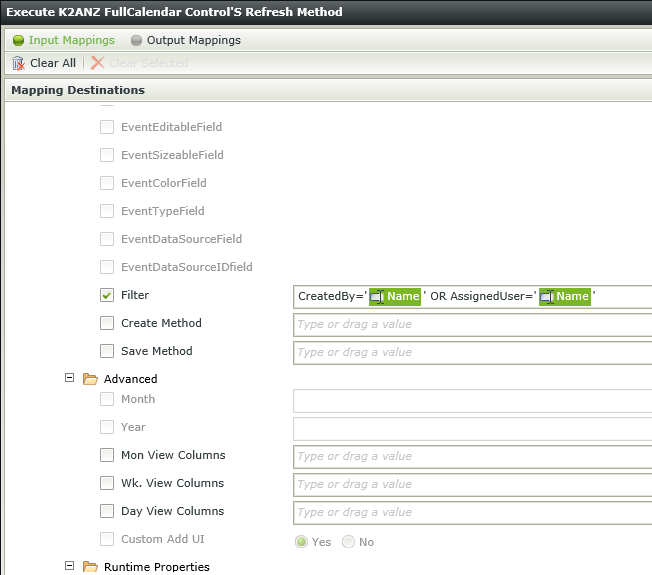
The Calendar control Refresh method configuration
The screenshot below shows how to configure the Refresh method of the Calendar. Notice a filter can be applied as well.
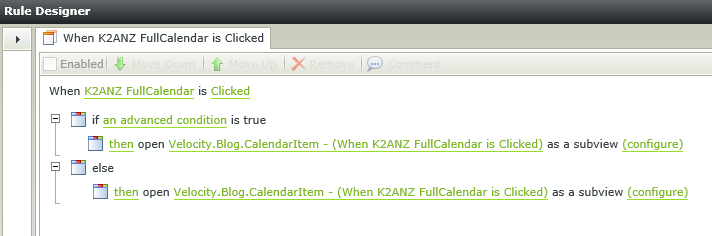
Supported Calendar events
The Clicked and Changed methods are supported. See the configuration below:

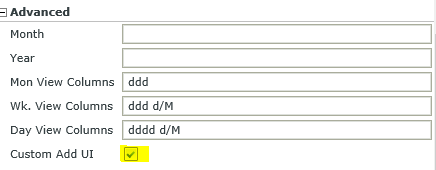
How to integrate a custom User Interface with the Calendar
1.Check the ‘Custom Add UI‘ available in the advanced control property of calendar control
2. Use the click event of calendar and configure the rule to open custom built view or form on click of calendar
3. Use the below mentioned calendar run-time properties which return the calendar values for existing calendar events which can be used to pass the values to custom UI.

Please note, the ‘Value’ return the Calendar entry identifier. This is the record’s primary Key.
Acknowledgements
Deon Smit http://community.k2.com/t5/user/viewprofilepage/user-id/335 for the original Calendar source code available here http://community.k2.com/t5/K2-blackpearl/Full-Calendar-Control/ba-p/1119