


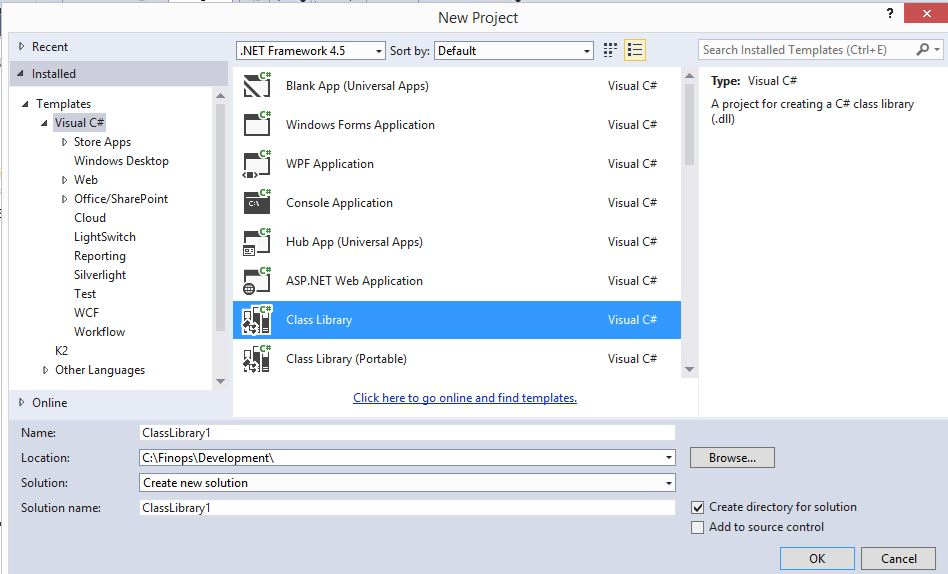
In this article we will look at how to create a custom K2 Service Object in a C# class library. To start off you need to create a new Project with a new solution, and name it appropriately. Select Class Library as the project type.
1 – New K2 Service Object Class
K2 Automated Testing Software
BenchQA allows full test automation of K2, including fully automated K2 SmartForms and K2 Workflow testing. It promotes test driven development for K2 and ensures continued quality assurance for K2 solutions. Easily apply changes to test cases to accommodate changes to K2 apps and ensure all apps are regression tested to avoid defects and assure continuous quality.

To following long with this post I’d also suggest installing a Nuget package that contains the framework code for a custom K2 Service Broker. To do this, right-click on the project in Visual Stuio, select manage nuget packages, and the search for “Velocity IT-IT” and select the Velocity IT-IT K2 ServiceBroker package, as indicated in the screenshot below.

2 – New Velocity IT Service Object Nuget package
The package firstly adds the SourceCode.SmartObjects.Services.ServiceSDK library to your project. This library contains the abse classes you will be using in you custom service object.
The package allso adds two following two files to your project:
• ServiceBroker.cs – a class that inherits from ServiceAssemblyBase, a base class in the above mentioned dll. This class serves as a service broker – it serves up descriptions of your custom service objects so that you can consume these services from a K2 SmartObject, and also provides the entry point to you service objects when a method gets executed.
• Example.cs – This is an example service object to indicate how your custom service objects should be built.
The package also executes a powershell script that adds a post-build event to your project. This post-build build event copies the assembly dll to the K2 ServiceBroker directory, which is the directory used for service type discovery by the SmartObjects – Services – Tester when you register a new service type.
Also note that you have to add the following two lines of code to your AssemblyInfo.cs class to designate the assembly as a K2 ServiceObject broker.
3 – Assembly Info
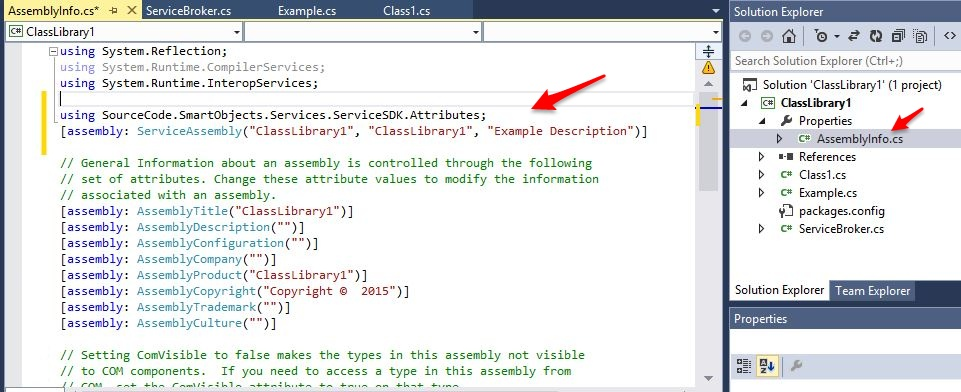
4 – Assembly Info
To create a new service object you need to add a new class to the project, with a similar structure to the Example class which already exists. When this class and its properties and methods are marked with the correct attributes the ServiceBroker will take care of autodiscovery and make your new object available through the service instance. We will not discuss these properties in depth here, simple open the Example.cs file in the project, it is well annotated and will guide you with the creation of your new service object.
After you have added your new object, build the solution.
Finally we need to register the service type with K2 and add a new service instance which we can consume. To do this open the SmartObjects – Services – Tester and click on ‘Register ServiceType’.
5 – Register Service Type
Now select you new service broker in the Service drop-down as indicated below.
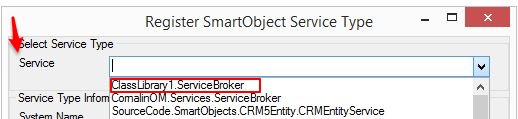
6 – Service Name
Finally a displayname and a descitpion and press add.

7 – Service Details
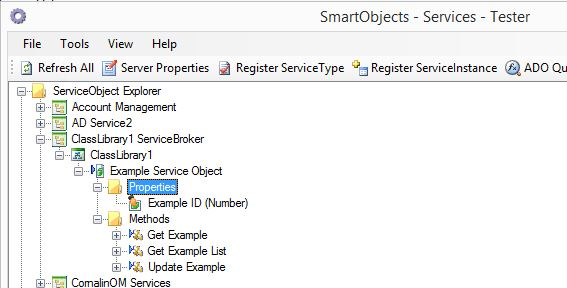
Your new broker, or service type, will now be available in the ServiceObject Explorer.
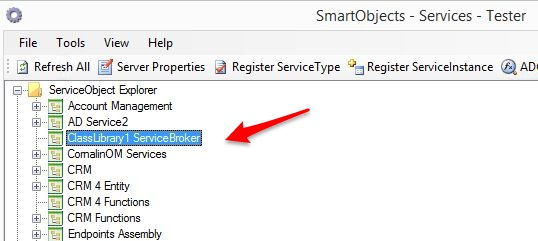
8 – Service
To add a new service instance right-click on the service type, and select Register Service Instance.
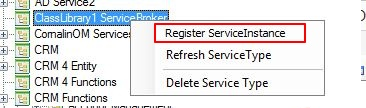
9 – Register Service Instance
Your new service object will now be available for use.
10 – Completed K2 Service Object