Last week, I had a look at the power of K2 SmartObjects and their ability to provide the K2 instance with data from a variety of sources. I took a very simple example and showed how it’s possible to publish a K2 SmartObject from a Microsoft SQL Server database into the K2 system. Next we’ll have a look at what functionality the K2 SmartObject provides, and how we can add additional functionality where it’s needed.
I’ll open the K2 SmartObject I published last week, and look at what properties and methods are available.
K2 Automated Testing Software
BenchQA allows full test automation of K2, including fully automated K2 SmartForms and K2 Workflow testing. It promotes test driven development for K2 and ensures continued quality assurance for K2 solutions. Easily apply changes to test cases to accommodate changes to K2 apps and ensure all apps are regression tested to avoid defects and assure continuous quality.
First, I will select the SmartObject by left-clicking on the SmartObject in the K2 Designer.
When a K2 SmartObject is selected, the K2 Designer will display important information about the K2 SmartObject and allow us to edit the SmartObject. Next I will click on the Edit button.
The K2 Designer will now display the available properties. Notice how the properties match exactly to the fields in the database table that was used to publish the K2 SmartObject.
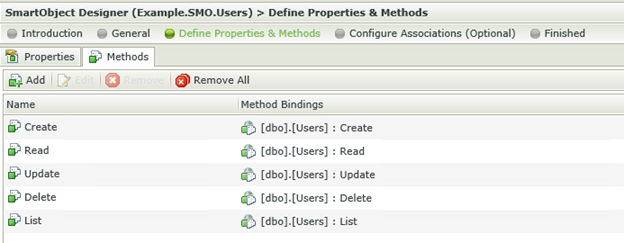
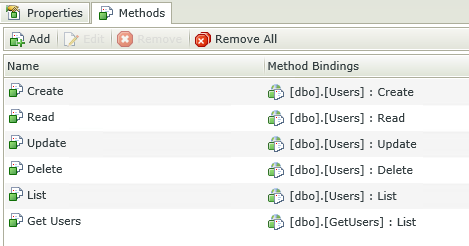
Clicking on the Methods tab reveals the Methods available. By default K2 creates the Create, Read, Update and Delete methods, which is used to list, insert, update and remove information from the database table.
Now that I have seen the available properties and methods, I will add a new method to the existing SmartObject and get data from the database using a Stored Procedure.
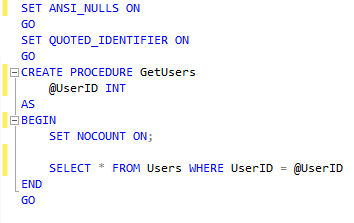
Naturally the first step is to create the Stored Procedure I wish to utilize. I have created a simple stored procedure that lists the Users in the Users table. Even though such a method already exists, I will keep it simple for the purpose of this example. Keep in mind that this method is generally used for more complex queries.
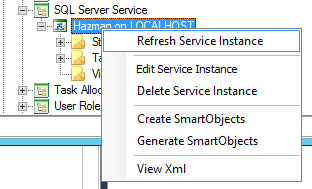
When making changes to the database, already remember to refresh the SQL instance in the K2 SmartObject Tester, see the previous blog if you are unsure how to do this.
Now that K2 is aware of the newly created Stored Procedure, let’s add the stored procedure to the corresponding SmartObject. It is always a good idea to keep Stored Procedures associated with the SmartObject they represent.
Going back into the K2 Designer, and selecting the Methods tab. I will click on the Add button. The next step is to select the stored procedure I wish to add to my SmartObject. K2 provides a list of all Service instances, make sure you select the one you are working with.
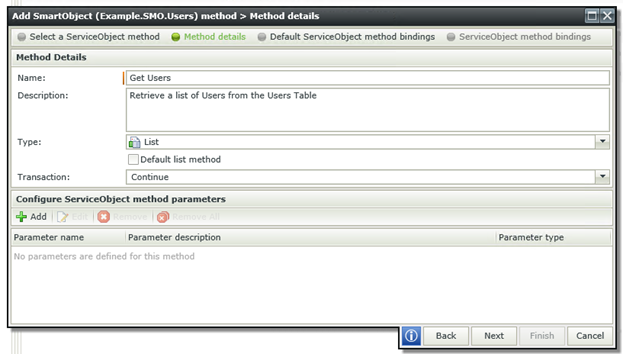
I will now click on the Next button. It is now time to enter the Method details. Always make sure you give your Method a descriptive name that will help you identify the purpose of the Method, at the same time, remember to keep it short.
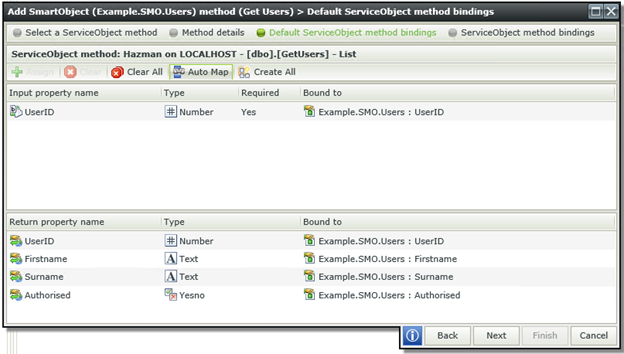
Once all the method details have been filled in, I will click on the Next button again. This will bring me to the Mapping section of the wizard. It provides a list of input methods, which corresponds with the parameters required by the Stored Procedure. In this case it will be the UserID. Next it will provide a list of fields returned by the Stored Procedure. In this case the exact same fields used in the User table. If all my input and output parameters match with Properties already available on the SmartObject I can simply use the Automap feature, and K2 will automatically map my input and output parameters to the available properties.
Once all the parameters are mapped you can click on the Finish button. Notice now that the newly created Method appears in the Methods list on the K2 SmartObject.
Adding methods to SmartObjects is a great way of expanding on the functionality provided by default. When what you need is just a little bit more than the usual CRUD functions. Always remember to keep things simple and well organized.


